The P102 now seems to be positioned as Ryobi's new "standard" 18v battery.
It's packaged with nearly every new Ryobi kit, even those for which a compact battery seems totally inappropriate (e.g., leaf blower).
I confess I haven't actually a used P102 batteries much.
I favor my P108 batteries for most tasks, and my aging P103 compact lithium batteries still have enough life left
that I haven't felt compelled to replace them (though when I do I'll probably go with the P107).
But I've tested over 1,600 P102 batteries
and I've finally gotten around to pulling one apart to troubleshoot a problem I encountered (keep reading),
so I guess I have some information worth sharing.
First of all, let me say that I think Ryobi has made the right decision to promote a compact Lithium Ion battery as the new "standard".
For most home users, the lighter weight and greater shelf life of the P102 are a much better choice than the big, heavy P100.
But if you've read the reviews of the P102 on The Home Depot's web site, you'll see that this battery is not well liked by consumers.
Most of the complaints describe how the battery was no longer able to accept a charge after only a few months, or even after its first use.
How can this be?
As it turns out, I think that Ryobi made an engineering error on the P102 that is its Achilles Heel:
The P102 is disturbingly easy to "kill", even on its first use!
And by "kill" I mean that when you place a fully discharged P102 battery on a dual chemistry charger,
the charger will evaluate the pack and then blink "faulty" rather than charge the battery.
What brought this to my attention was some P102 battery purchasers who complained of faulty P102 batteries, DOA from the box.
These were batteries which I'd tested as good, and I even had the discharge charts on these batteries so I was certain that they'd performed just fine for me.
I was very confused, and It took me awhile to figure this out, but here's what happened.
I connect Ryobi 18v batteries to my Computerized Battery Analyzer via a P150 Fuel Gauge, to which I lap soldered two wires.
The two wires go to my Computerized Battery Analyzer.
To test a battery I slide the P150 onto the battery.
The LEDs on the P150 Fuel Gauge will do the usual power-on cycle and then show a full "four bars".
Then I start the test, which is to steadily discharge the battery at 2.5A until the voltage reaches 14v.
During the test, the LEDs on the P150 show "three bars", then "two bars", and after about 30 minutes when the test is done it will show just "one bar".
I'll then disconnect the battery, put it on the charger, and move on to testing the next battery.
I consider a battery "good" if it tests at over 90% capacity.
One night I went to bed and forgot that I'd left a test in progress.
When I got up in the morning, I noticed that the P150 showed "zero bars".
I put the battery on my charger and it blinked "faulty".
Ryobi (and other manufacturers) install a circuit on their Lithium Ion batteries which is supposed to
disconnect the battery from the load when the voltage gets too low.
If you've used a Ryobi tool with a Lithium Ion battery you've probably noticed this behavior as an abrupt stop
when the battery is almost all the way discharged.
It seems that the internal circuit which detects a low voltage in the P102 battery does not work well
when the load is very, very small (like that of the LED lights in the P150).
So what happened is that the tester discharged the battery down to 14v,
then because I did not remove the battery from the tester the P150 kept on discharging the battery until it was too late.
This wasn't the first time I'd forgotten to remove a battery before going to bed, so I immediately checked all of my bins of "tested good" batteries.
Sure enough, I found several P102 batteries which had tested fine but were no longer functioning properly (!!).
To my knowledge, this does not happen to P103, P104, P105, P107, or P108 batteries, just the P102.
Interestingly, some of these "killed" P102 batteries will show as faulty,
some will immediately show "green" as if they're fully charged (even though they're dead -- I guess they're zombies?!),
and for some the charger's red light will come on and that's it (it won't blink to indicate "evaluating").
I put aside all of the P102 batteries I'd killed, and from then on
I've taken extreme care to remove P102 batteries from the tester ASAP after the test concludes.
No doubt this phenomenon is at least partly to blame for the P102's poor reviews.
Anyone who depletes a P102 then fails to recharge it and put it aside immediately could see this behavior.
The battery could be killed by being discharged and left in the tool while the tool's switch is "on"
(some tools continue to try and discharge a depleted battery).
It could be that even though the discharged battery was removed from the tool,
it was placed on the shelf afterwards rather than on a charger (and the battery self-discharges too far before a recharge is attempted).
It could even be that the battery was removed from the tool and charged immediately after use,
but then the charger was unplugged without first removing the battery (an unplugged charger will slowly discharge a battery).
One day I had a conversation with someone who was asking about replacing individual cells in a Lithium Ion pack,
and among other things I mentioned that one should be certain to ensure that all cells in a pack
are at the same voltage before placing the assembled battery on the charger.
Do this since these chargers don't evaluate each cell individually,
and if the cells aren't evenly charged the pack's performance will suffer and/or the charger may indicate a fault.
Then I had an epiphany -- the problem with the killed P102 batteries could simply be that the combined cell voltage is so low
that the charger refuses to charge it for safety reasons.
Or it could be that the P102 internal circuit board which disallows the charge, not sure.
So I cracked open one of the P102 batteries and pulled out my TEK4 RP4040 Multimeter.
All of the cells were well under the minimum 2.8v recommendation for Lithium Ion cells.
So I set my bench power supply to the same voltage as the P102.
Then with a couple of alligator clip leads I connected the string of cells to my bench power supply.
I slowly raised the voltage to just over 14v, ensuring that the current draw never exceeded 500mA.
Then I reassembled the pack, put it on a Ryobi charger and VOILA! it proceeded to fully charge the battery.
Yes, this P102 pack had returned from Zombie land!
As Miracle Max might say "It just so happens that your P102 here is only MOSTLY dead.
There's a big difference between mostly dead and all dead.
Mostly dead is slightly alive."
It's entirely possible that many of the P102 batteries that are believed to have experienced a premature death may actually be fully recoverable.
Simply open the pack and charge each cell individually up to 2.8v, or carefully charge the entire pack to just over 14v.
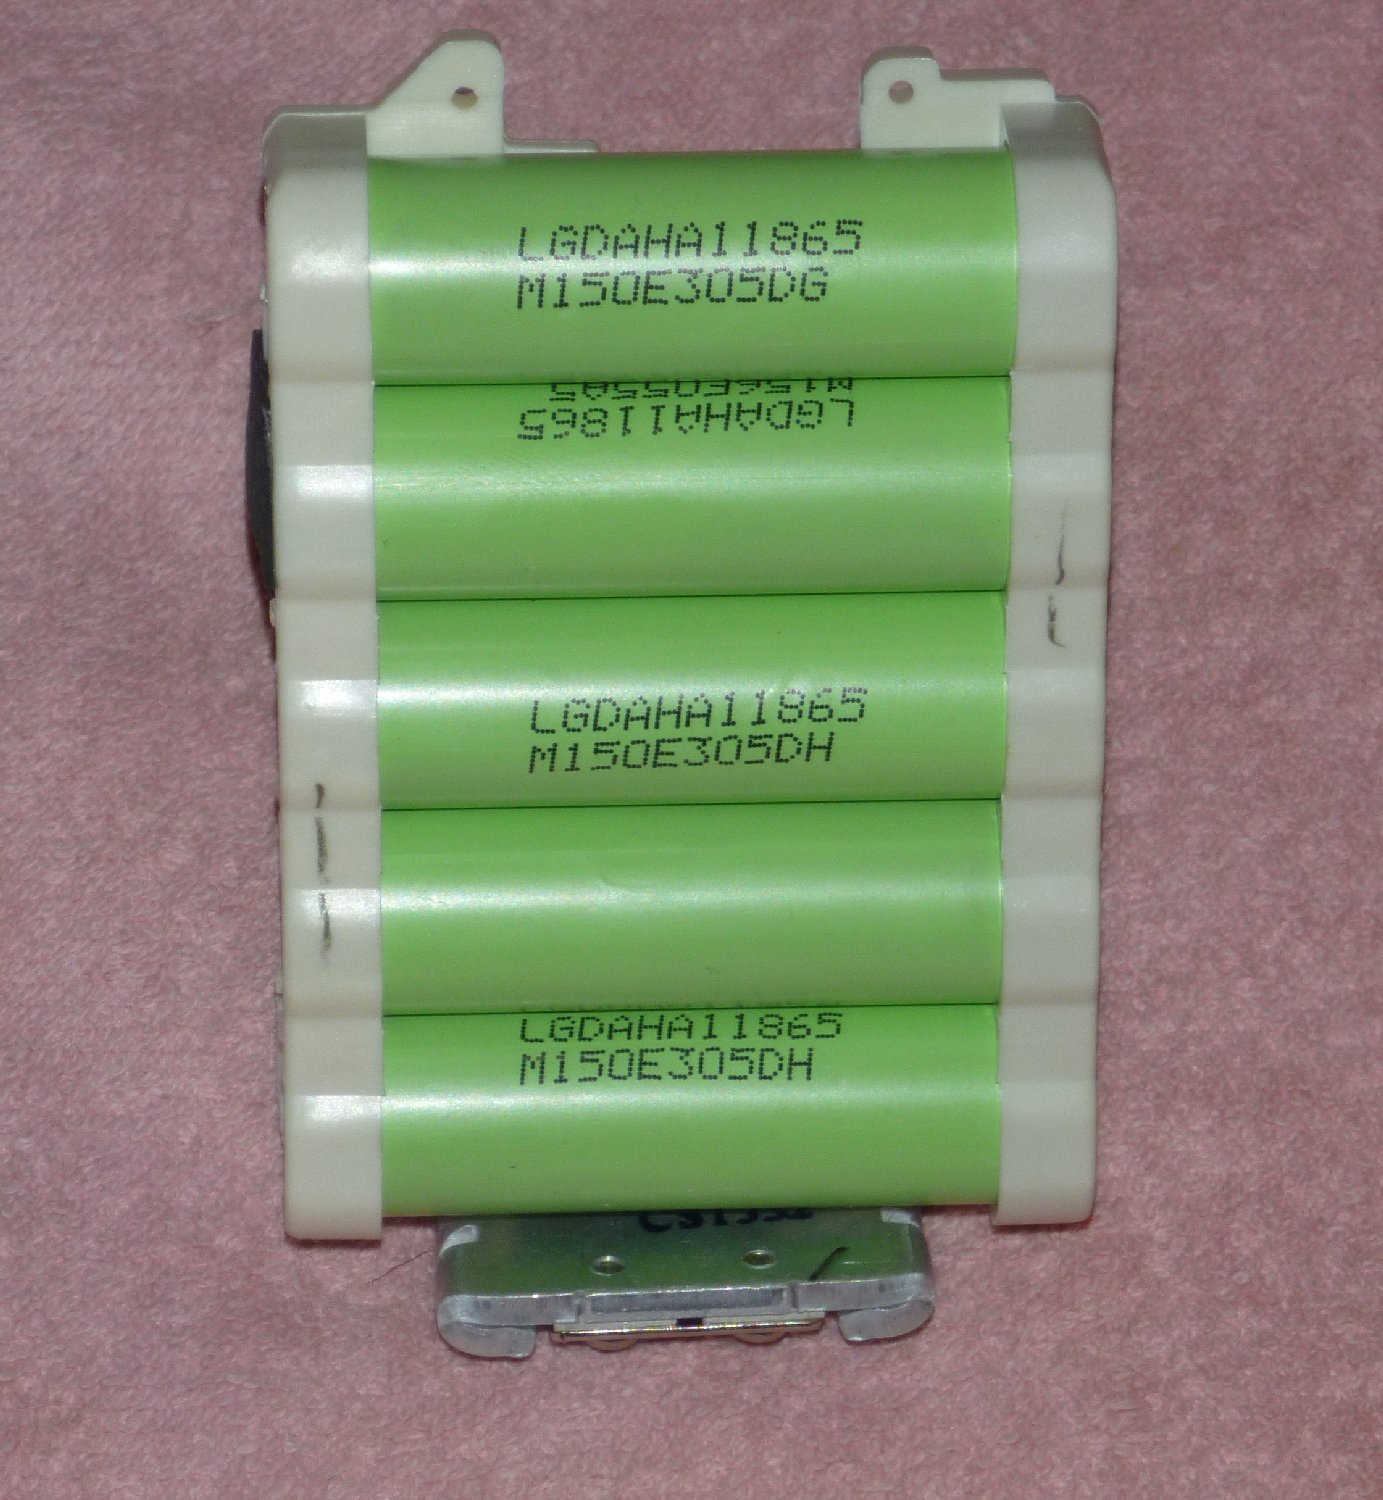
Incidentally, when I cracked open that first P102 I was VERY surprised to find that the cells are not 1200mAH, as I'd suspected all along.
The cells are labeled LGDAHA11865, and an Internet search reveals that these are 1300mAh cells by LG.
Until 2014 I'd NEVER had a single P102 test at over 1200mAh, so I'll conclude that the cells in the pre-2014 P102 packs are overrated by about 10%.
In 2014 I've encountered some batches which test in the 1225mAh-1250mAh range.
This is still short of the manufacturer's claim of 1300mAh, but hopefully this is an indication of some improvement in the cell quality.
All of these are unlike the Samsung INR18650-13Q cells which can be found in the oldest P103 batteries,
which are rated 1300mAh and regularly tested at or above their 1300mAh rating.
Shortly before the P103 was discontinued, Ryobi changed the P103 to contain Samsung INR18650-15Q batteries,
which are rated 1500mAh and regularly tested at or above their 1500mAh rating.
My P102 is dead, and I don't have a bench power supply. How can I fix it myself?
First of all, be aware that the problem with your "dead" pack may be different than what's been described above.
If so, then attempting to "revive" the battery by charging the cells directly may not work.
Furthermore you could end up rupturing a cell which could lead to an injury or starting a fire.
So please don't try this unless you're certain of what you're doing.
Also, Ryobi warrants their batteries for THREE YEARS from the date of purchase,
so if you still have your receipt from The Home Depot I'd recommend contacting your
nearest Ryobi Authorized Service Center for warranty service.
You're still reading, so you must be curious or you really want to try this.
This technique works great your P102 pack is "dead" because the voltage on the cells in your pack have gotten too low. This
technique will NOT work if your cells are old and worn out, if you have one or more bad cells, or if you have a bad logic board
(e.g., factory defect, some component "fried", your P102 battery has been submerged in water or left out in the rain).
If executed properly, it'll take longer to disassemble your P102 pack than to actually revive it. You'll need:
three jumper wires . I use red, black, and yellow. Wires with alligator clips are preferred.
a Torx T10 security bit screwdriver
a Ryobi 18v charger (any model)
a knife or other sharp edged tool for prying.
Note: I've done this with a Ryobi P118 charger, but I suspect that it would work with any model Ryobi 18v charger.
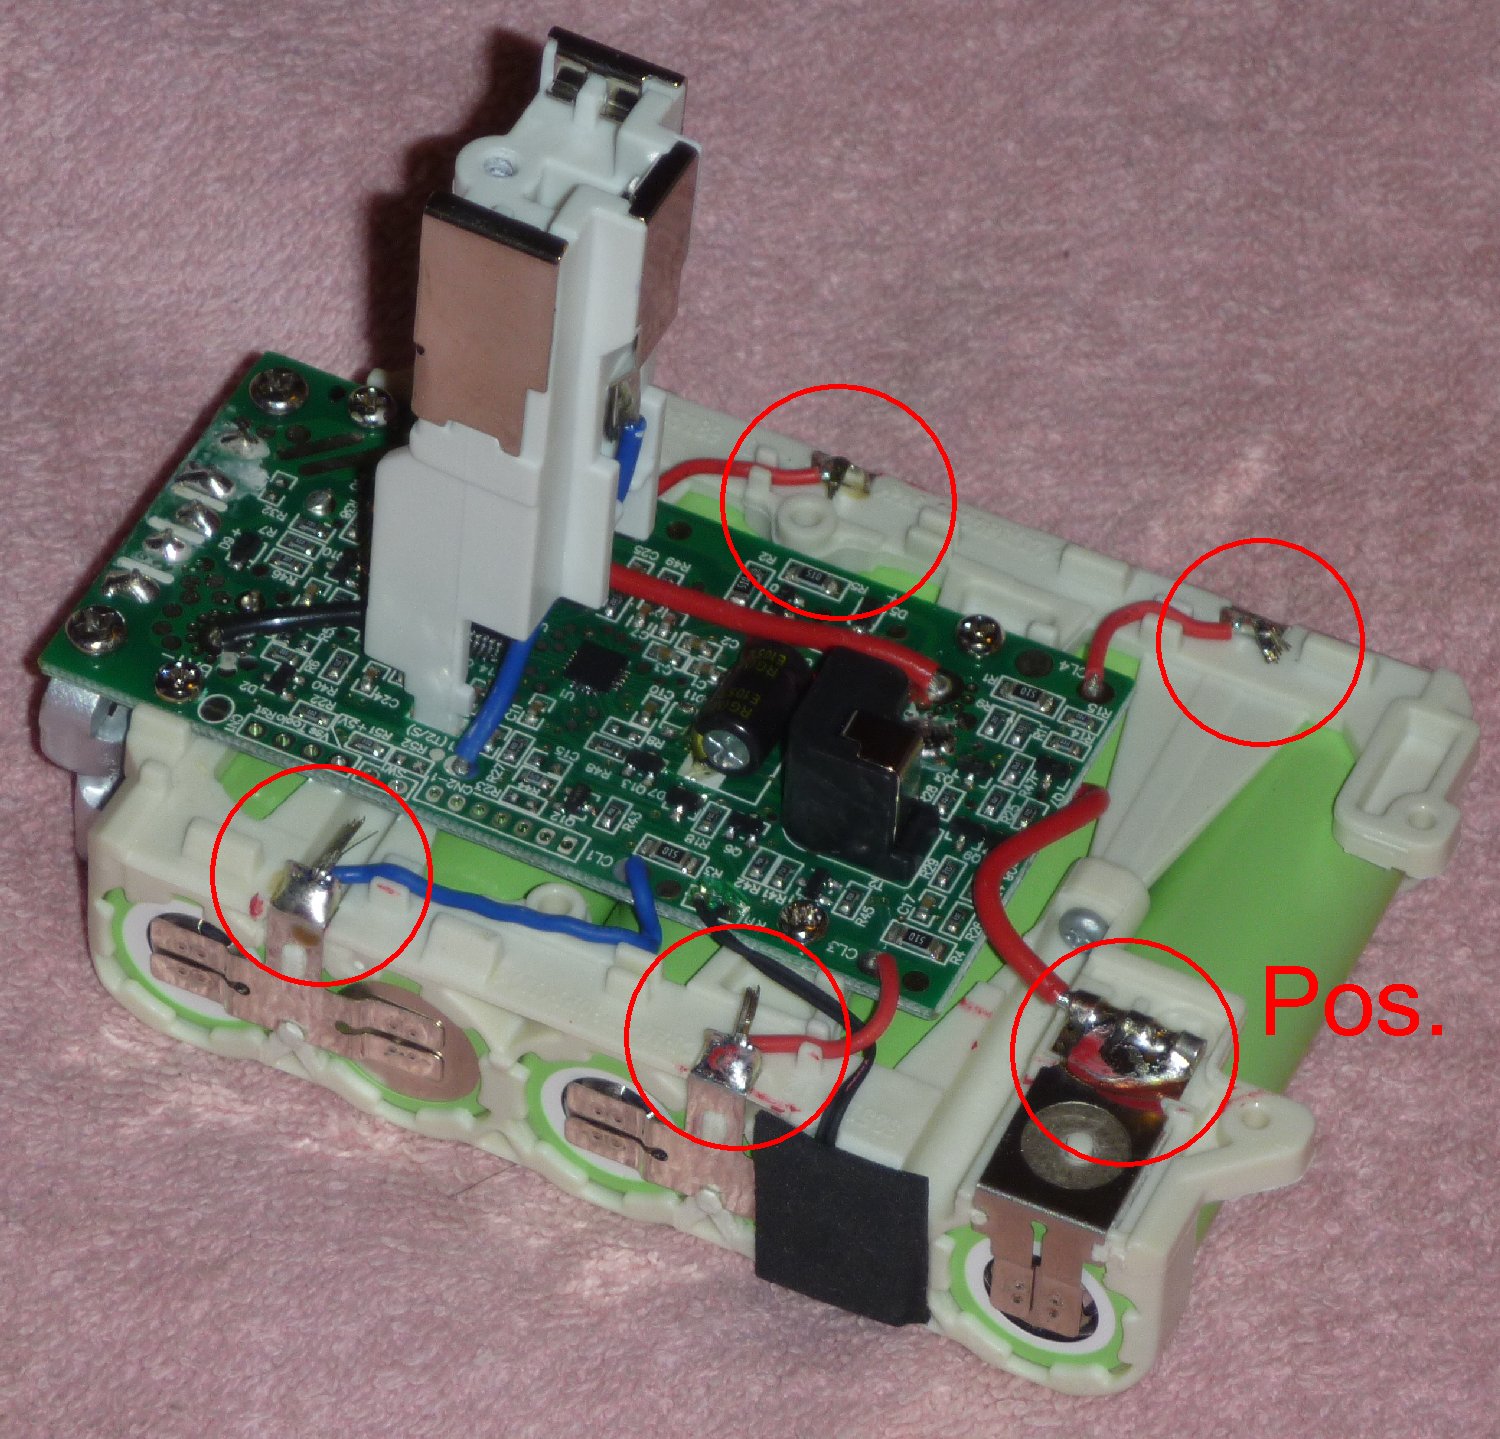
Pry out the tamper evident plug with the sharp edged tool. Note that doing so VOIDS your warranty.
Remove the five screws (four in the base and one in the stem).
Pull the top half off the plastic casing off of battery.
Ensure that the Ryobi charger is unplugged.
Attach the BLACK jumper wire to the negative connector in the Ryobi charger (marked "-").
Attach the RED jumper wire to the positive connector in the Ryobi charger (marked "+")
Attach the YELLOW jumper wire to the remaining connector in the Ryobi charger (not marked).
Attach the other end of the RED jumper to the exposed positive terminal with the battery which I've marked "Pos." in the photos.
Ensure that the other two jumpers wires are not touching each other or anything conductive, then plug in the charger. The RED LED will glow steadily to indicate that it has been energized.
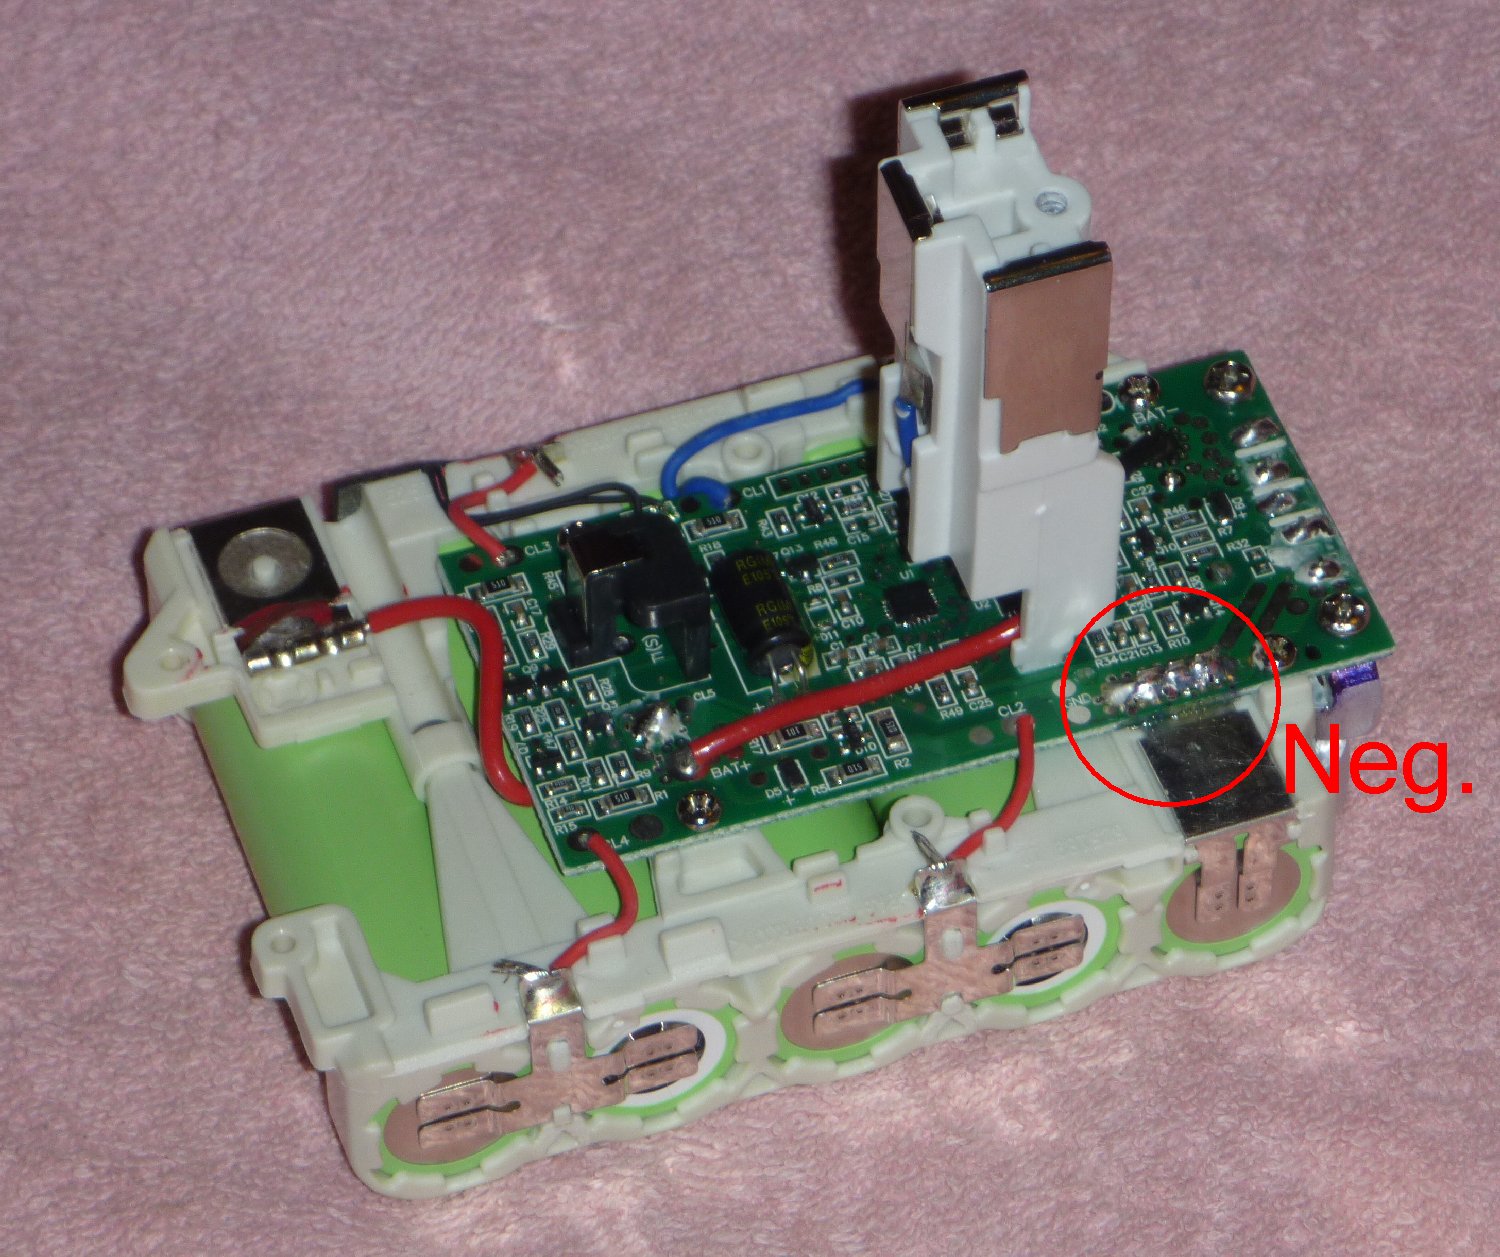
Locate the exposed negative terminal within the battery which I've marked "Neg." in the photos. This will be diagonally opposite the "Pos." terminal.
(The next few steps will be repeated several times.)
Simultaneously touch and hold the other two jumper wires to the exposed negative terminal in the battery.
What you'll observe is that the RED LED blinks. After 4-5 seconds, the RED LED goes out and the GREED LED blinks. After a couple of seconds, the GREEN LED stays on, as if to indicate that the battery is fully charged (which it's not).
Stop holding the two jumper wires to the exposed negative terminal. The GREEN LED goes out and the RED LED comes on.
Repeat the above section several times.
What's happening above is that you're fooling the charger into thinking that a NiCD battery has been connected. The charger
applies a small charge current while the RED LED is blinking, and a large charge current while the GREEN LED is blinking. I
measured these on a P118 charger at .08A during the RED LED blinking and 1.8A during the GREED LED blinking. With each repetition,
the voltage on the pack is raised a little, and after 5-10 repetitions the voltage is high enough that the pack can be charged
normally.
Unplug the Ryobi charger and disconnect all jumper wires.
Click the plastic shell back on top of the battery.
Plug in the charger, and insert the battery onto the charger. It should start charging as it normally would.
If the battery will not charge, you can try the above process a second time.
If the battery does charge normally, wait a minute or two and then remove the battery to re-insert the screws.
Now put the battery back on the charger and let it charge fully. You're Good-To-Go!
This page brought to you by eBay's TOOLBOY Last revised 07-Apr-2022
Count since 22-Oct-2014: